to get your entries in for our Nov/Dec challenge....Holidays and Celebrations
Pop over here and have a look at what's been done... amazing work everyone...
Enjoy the last few days of 2011.
Hugs
Dawn

Wednesday, December 28, 2011
Saturday, October 1, 2011
Octobers Challenge and a Winner
Arlene has an easy peasy challenge for you!
you have 2 options
Option 1.Make a gift tag - any event, e.g. Christmas, Halloween, Birthday......
OR
Option 2.
Make a tag card - simple and easy.
Remember:
1. Limit of 4 entries for each challenge per month
2. Random Drawing will be held the last day of the month
3. If a moderator is not hosting a challenge for the month, the moderator can enter the challenge
To add you picture to our flickr thread, copy direct link of your card on flickr and paste it here adding these square brackets on both ends. Like so… [your link here].
OR
o Link a picture of your card, make sure you have the photo of your card up. Click on "Share" above your card. Then click on the code below in the box labeled Grab the HTML/BBCode, Copy and paste the code below: This is the way I do it - very easy.
Have fun!
Here are some examples: Halloween card shaped like a tag. You can also make a card that has a pocket for a tag.

Prize for October: Some die-cut butterflies - about 20, solid colored blank cards with envelopes and 10 cards with patterns, 10 8 X 7 solid colored cardstock & a package of Xmas brads. I will add more to the prize as the month goes on.

you have 2 options
Option 1.Make a gift tag - any event, e.g. Christmas, Halloween, Birthday......
OR
Option 2.
Make a tag card - simple and easy.
Remember:
1. Limit of 4 entries for each challenge per month
2. Random Drawing will be held the last day of the month
3. If a moderator is not hosting a challenge for the month, the moderator can enter the challenge
To add you picture to our flickr thread, copy direct link of your card on flickr and paste it here adding these square brackets on both ends. Like so… [your link here].
OR
o Link a picture of your card, make sure you have the photo of your card up. Click on "Share" above your card. Then click on the code below in the box labeled Grab the HTML/BBCode, Copy and paste the code below: This is the way I do it - very easy.
Have fun!
Here are some examples: Halloween card shaped like a tag. You can also make a card that has a pocket for a tag.
Prize for October: Some die-cut butterflies - about 20, solid colored blank cards with envelopes and 10 cards with patterns, 10 8 X 7 solid colored cardstock & a package of Xmas brads. I will add more to the prize as the month goes on.
And I would like to announce Our winner for last month's Challenge.
Congratulations to Marcy!!!!!!!!! and thanks everyone for playing along.
Saturday, September 24, 2011
Embossing With a Digital Stamp and a Dish Rag
I recently saw this amazing post from Faith ~ using her Cuttlebug, some digital images, some embossing.... after contacting her I have now permission to post this here for your enjoyment.
*****************************************************************


*****************************************************************
Boy, oh boy, do I have a lot to share with you tonight! I had two hours alone with my Cuttlebug toady and came up with some interesting embossing techniques. AND I printed on the inside of a cereal box–probably not acid free, but a lot of fun!
There are also a couple of software hints and shortcuts in this post that will speed up your time on the computer, so you can get to crafting your card quickly. These cards are EASY and have so much texture and dimension!
I used my digital stamp “Mitten” for these two cards. You will want to pick this digi up in my store for just $1, because it is so versatile!! It’s perfect for “Warm Winter Wishes” for the upcoming holiday’s or a winter birthday.
 |
| Challenge Card for: Pixie Cottage- Stiching Sweet Stampin Challenge Blog: Ribbon Our Creative Corner: 3 Embellishments (buttons, twine, twill tape, ribbon) Paper Romance: Buttons 365 Cards: Try a New Technique (create your own embossing “folders”) Mark’s Finest Papers’ Friends: Stitching |

We’ll start with the red card.
You will need to trim a cereal box or something similar to fit in your printer. I trimmed this box to 7 x 10 inches. I also set the lever on my printer to envelope, so that the box would feed through easier.

Computer Hints
I used Microsoft Word to create a document the size of my cereal box (7 x 10), and I inserted the digi stamp into the .doc. I made the Mitten 1.5 inches tall, and set the Text Wrapping to “Through”. This allows you to move it anywhere on the page. While the mitten was selected, I hit ctrl + c to copy, and then ctrl + v to paste. This way you do not need to set the Position or Text Wrapping each time.
With this second Mitten, I mirrored it by Position > Flip Horizontal, and then placed it below the first mitten. With one Mitten selected, press ctrl and click on the other mitten. Both mittens will be selected. Hit ctrl + c, then crtl + v, and this will copy both and paste them. Now drag this group of two over, and you have four. Repeat until you have eight–four the original way, and four mirrored.
This is the printed cereal box:

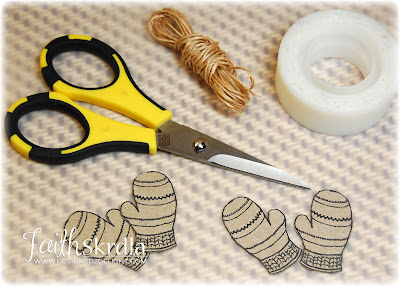
Cut the Mittens out using sharp scissors. You will also need hemp twine and tape.

Tape or glue the twine to the back of the mittens to make pairs.

The Cuttlebug sandwich will be Plate A, cardstock shims, Plate B (if your Plate B is as used/rough as mine, see below, then you will need a smooth piece of cardstock on top of it.),…

On top of the smooth surface, arrange your cut out Mittens. Then place your cardstock to be embossed, the Spellbinders Tan polymer mat, and finally, Plate B.

Run this through your Cuttlebug.

And you will have custom embossed paper using a digital stamp! Punches work well too.

Here’s my card using the digi stamp for embossing, and then using the Mittens I cut out from the cereal box, as the focal point of my card.

I used some warm grey Tria markers to color my Mittens before adding them to my card.

Embossing in this way, preserved the texture of my Bazzill cardstock.


Blue Card
Here’s how you can create your own textured cardstock. I used some smooth SU! Bordering Blue cardstock, and an old dish cloth that I crocheted.
Cuttlebug sandwich for this: Plate A, Plate B, Dish Cloth, Cardstock, tan polymer mat, Plate B.
Here’s what you get: And as you can see, my dish cloth is now pretty flat. lol! But it’s an old one, and it was worth it. :) Maybe it will be reshaped in the wash.

I used a large scalloped rectangle Nestabilities die to created this scalloped edge:

Insert your cardstock into one edge of the Nestie. The paper will be under one side, and over the other side.

Make your Cuttlebug cutting sandwich: Plate A, Plate C, Nestabilities Die with the the ridge facing up, and cardstock over the cutting ridge on one side, Plate B.

Here’s what you end up with:

You could use this as a card base. I cut mine way down to use under my twill tape and ribbon, and distressed the other edge.

If you want one Mitten to stick up higher than the other, you can double up the foam tape.


And here’s the completed card. I LOVE the crocheted texture on the cardstock!

I have many more ideas to try, and I will keep you posted on my experiments. :)
I hope this has sparked some creativity in you, and I would love to hear what you think. What are you going to press through your die cutting machine?
For more information on Cuttlebug Sandwiches and Nestabilities, please see my previous post about embossing a frame with Nestabilites.
****************************
thanks Faith for sharing this with us.
Dawn
Friday, September 16, 2011
A tutorial for hand embossing + Decorating a die cut flower
Hello Everyone,
Today I am going to show you how to make a simple but elegant card with more details and textures.


Step 2, Cutting your flower:
To cut the Tim Holtz Bigz dies (in this case the tattered florals) in your bigshot you will need the following sanwhich recipe as shown.

From bottom up: Acrylic plate, bigz die(facing up),cardstock, and the other acrylic plate.
Run through machine and pop out flowers.
Step 3, Embossing and distressing flowers:
Choose 2 embossing folders and place your flowers inside them,


So the flowers aren't so stiff, begin taking 1 at time and fold and/or crumple the petals inwards, I think it really helps the flowers stand out and gives a soft feel to the card.
Next apply a pop dot in-between the flowers for even more depth to the card.


Step 4, making leaves with a circle punch:
Punch a piece of cardstock and put the circle you just punched back in half way to get your leaf shape.


To color your leafs you can color with pencils, markers/copics, or distress inks, if you are using darker background colors, make sure to use darker greens, to match.
Step 5, Making your Butterfly punch come to life:
Punch 2 butterflies and distress each side then stamp your text only on 1 side of each with text sides facing out adhere the body leaving the wings to hang free


Have a Great weekend, I'm going to get ready to make pizza, and go to the Forest park Hot air balloon glow and then watch them race the energizer bunny tomorrow : )
Today I am going to show you how to make a simple but elegant card with more details and textures.

This is a very simple card, you have your stamped card base your layer , and your embellishments
now its time to add some texture.
Step 1, The layer for your base: (option get the basket weave embossing folder and stip this step)
Cut a 3 3/4 x 5 piece of cardstock and line it up against the envelope template of the score board (if you have the Martha Stewart Scoreboard) an score every 1/2 inch.

Rotate cardstock 90 degrees (NOT FLIP) and continue scoring every 1/2 inch, till you get it to look like this basket weave design.

Step 2, Cutting your flower:
To cut the Tim Holtz Bigz dies (in this case the tattered florals) in your bigshot you will need the following sanwhich recipe as shown.

From bottom up: Acrylic plate, bigz die(facing up),cardstock, and the other acrylic plate.
Run through machine and pop out flowers.
Step 3, Embossing and distressing flowers:
Choose 2 embossing folders and place your flowers inside them,

For the Bigshot use tab 1 of the Multi purpose plate, and sandwhich your embossing folder between that and the 2 acrylic plate, run through.

Next get the distress ink of your choosing ( I used faded jeans for the demo)
and apply to your flowers.

So the flowers aren't so stiff, begin taking 1 at time and fold and/or crumple the petals inwards, I think it really helps the flowers stand out and gives a soft feel to the card.
Next apply a pop dot in-between the flowers for even more depth to the card.


Step 4, making leaves with a circle punch:
Punch a piece of cardstock and put the circle you just punched back in half way to get your leaf shape.


To color your leafs you can color with pencils, markers/copics, or distress inks, if you are using darker background colors, make sure to use darker greens, to match.
Step 5, Making your Butterfly punch come to life:
Punch 2 butterflies and distress each side then stamp your text only on 1 side of each with text sides facing out adhere the body leaving the wings to hang free


Place a pop dot in between each wing, or for a side view fold the body over one set wings 

And Now you have all your elements ready to place on your card!

Have a Great weekend, I'm going to get ready to make pizza, and go to the Forest park Hot air balloon glow and then watch them race the energizer bunny tomorrow : )
Monday, September 12, 2011
More Vintage Inspiration
Good Day Readers!
It's time to post some more inspiration and today, I have some "vintagy" goodness to share with you, using a resist technique over patterned paper.

It's time to post some more inspiration and today, I have some "vintagy" goodness to share with you, using a resist technique over patterned paper.

...And a Nestie Die of course!
Supplies:
 |  |  |  |  |
 |  |  |  |  |

Subscribe to:
Posts (Atom)